Post Processors
Post Processors are a key step in Offline Programming because they can generate robot programs for a specific robot controller. Robot programming must follow vendor-specific programming rules, these rules are implemented in the post processor. A robot post processor defines how robot programs must be generated for a specific robot controller.
The conversion from the RoboDK simulation to a specific robot program is done by a Post Processor. Each robot is linked to a post processor which will define a specific robot programming style. The post processor is used when the program is generated offline, as shown in the Generate Program section (by right clicking a program, then, selecting Generate Robot Program).
RoboDK includes many post processors to support over 50 different robot manufacturers and controllers. Supported controllers are listed in the Available Post Processors section. Alternatively, it is possible to create customized post processor or modify an existing post processor. All available post processors are in the folder: C:/RoboDK/Posts/.
One post processor is a PY file (each post processor is defined by a Python script). It is possible to manually add, modify or delete the files in the Posts folder of RoboDK. If you have been provided a RoboDK post processor (PY file) it should be placed in the Posts folder so that it can be selected from RoboDK.
This section shows how to select, edit or create a post processor and use it with your robots in RoboDK. A quick introduction is available in the following video: https://www.robodk.com/help#PostProcessor
Select a Post Processor
You can easily select a post processor by right clicking a robot or a program. The choice of a post processor is assigned to a robot, therefore, changing the post processor assigned to a program will update the post processor used by all programs assigned to the same robot.
To select a post processor for a robot:
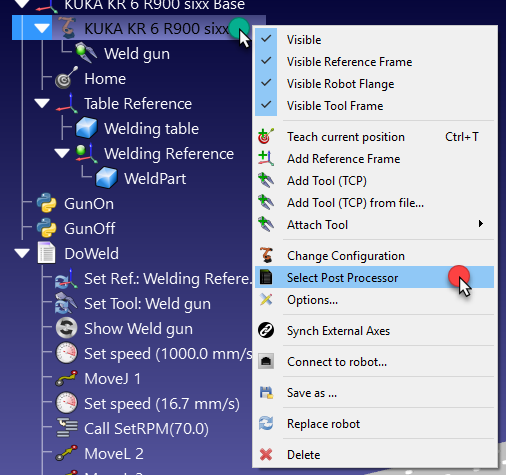
1.Right click a robot or a program
2.Select Select Post Processor
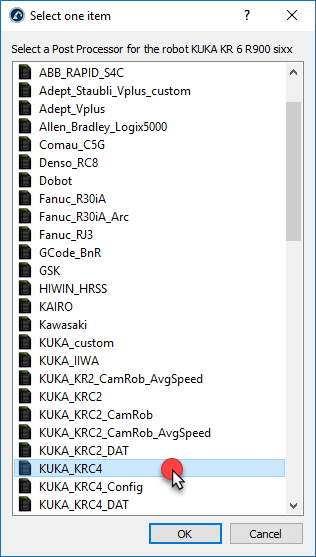
3.Choose a post processor from the list
4.Select OK.
The change is now applied, and the program can be generated again to see the result.
As an alternative, it is also possible to select the post processor by following these steps:
1.Open the robot panel (double click a robot)
2.Select Parameters
3.Select your post processor in the Robot brand box, as shown in the following image.
Post Processor Editor
You can easily modify post processor settings using a graphical user interface. The post processor editor allows you to modify variables defined in the post processor that are specific to your robot controller.
The post processor editor is a plugin that helps customize your post processors. You can easily download and install the plugin from the following page: https://robodk.com/addin/com.robodk.plugin.postprocessoreditor.
Follow these steps to open the post processor editor:
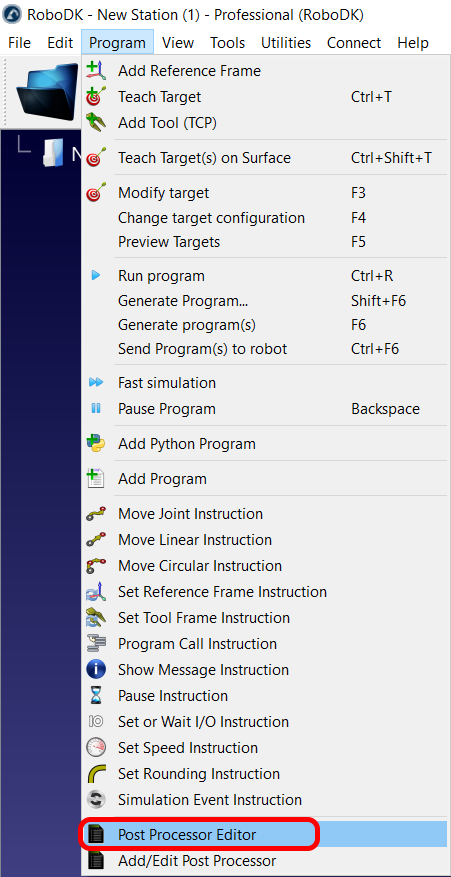
1.Select Program➔Post Processor Editor.
2.Select the post processor you want to customize.
3.Select OK. A new window will open, and you’ll see the variables you can modify.
4.Select Save Post Processor as…
5.Enter the name to save it.
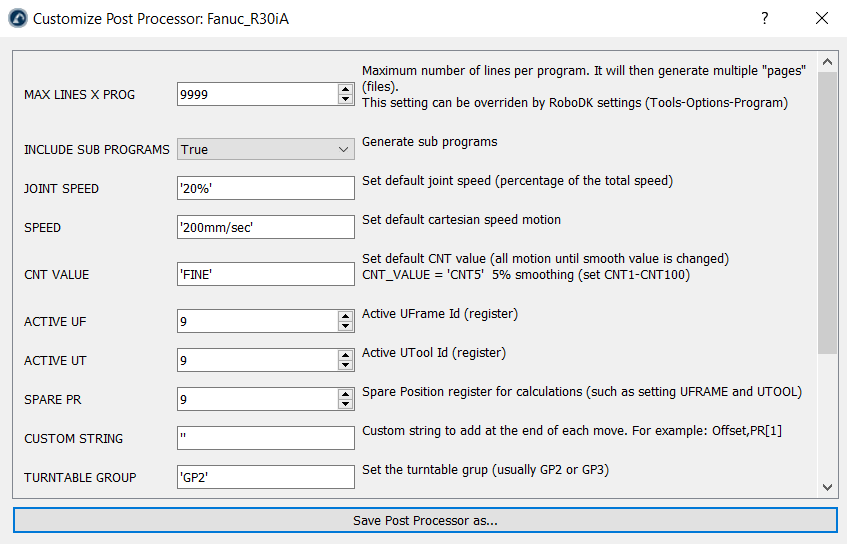
For example, if you select the Fanuc R30iA post processor you’ll see the window shown in the previous image.
Modify a Post Processor
You can modify existing post processors in RoboDK to customize the output of your robot programs or create new post processors. Most post processors don’t need editing but simply changing configuration flags to obtain the desired program output.
Make sure you have the source code of the post processor to edit it. Contact us if the post processor you are trying to edit is not editable (compiled).
Post processors must be placed in the folder C:/RoboDK/Posts/ so that they can be selected from RoboDK. The previous section describes how to link a specific robot to a post processor.
Each post processor is one PY file. It is possible to rename the file or copy files from/to the C:/RoboDK/Posts/ folder to share different post processors. To delete an existing post processor script, simply delete the corresponding PY file in the Posts folder.
Post processors can be edited using any text editor or a Python editor (Python IDLE). Using the Python editor allows to quickly debug and evaluate a sample program at the end of the file.
Python should be installed to test and use the post processors properly (Python is installed by default with RoboDK).
Follow these steps to modify an existing post processor:
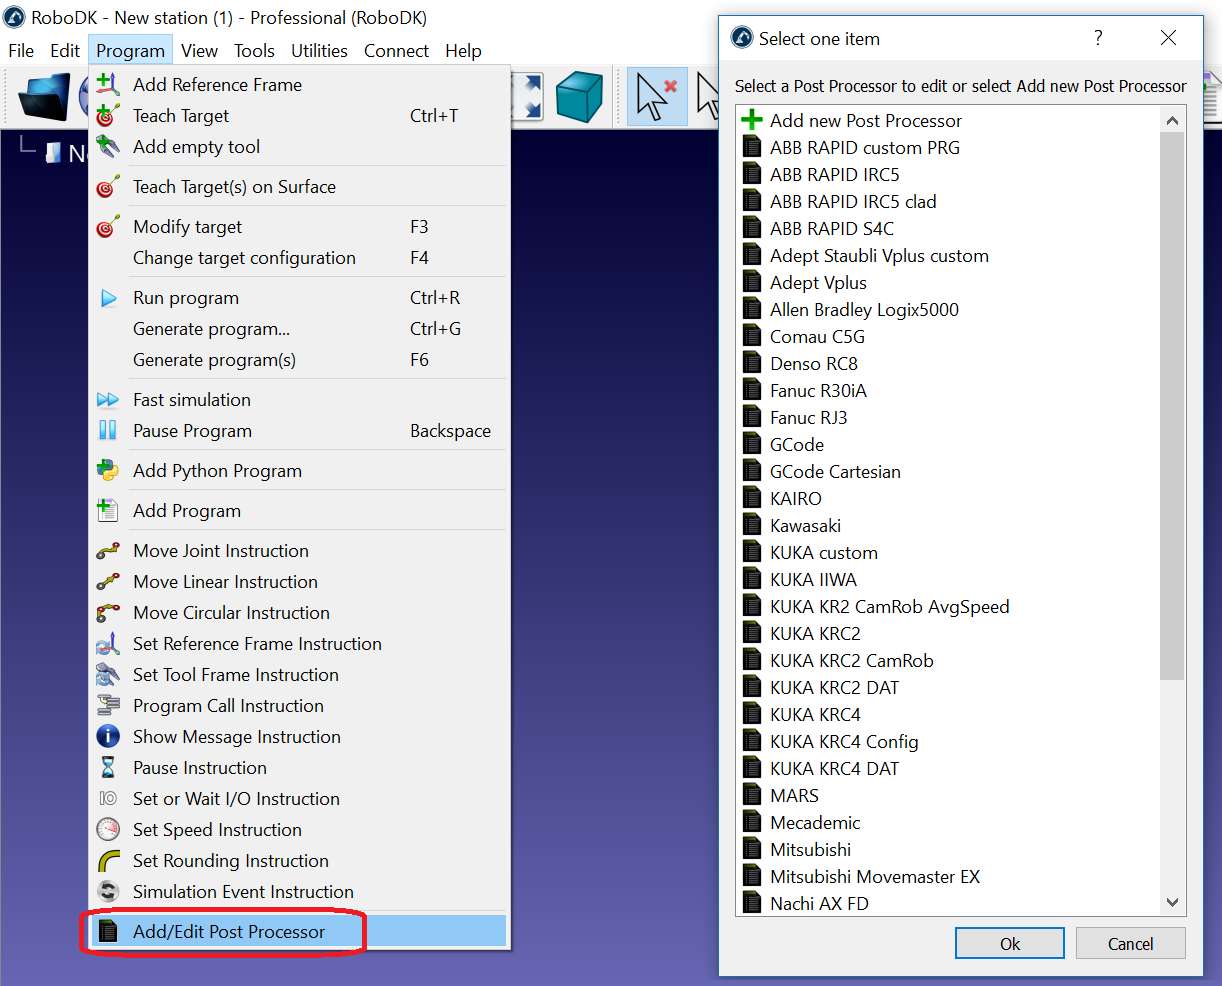
1.Select Program➔Add/Edit Post Processor
2.Select an existing post processor
3.Select OK. A text editor will open and the program.
4.Select Go➔Debug (F5) to preview the result. Make changes if necessary. Depending on the text editor you use you may have to select Run➔Run module (F5) instead.
Alternatively, it is possible to edit a post processor manually:
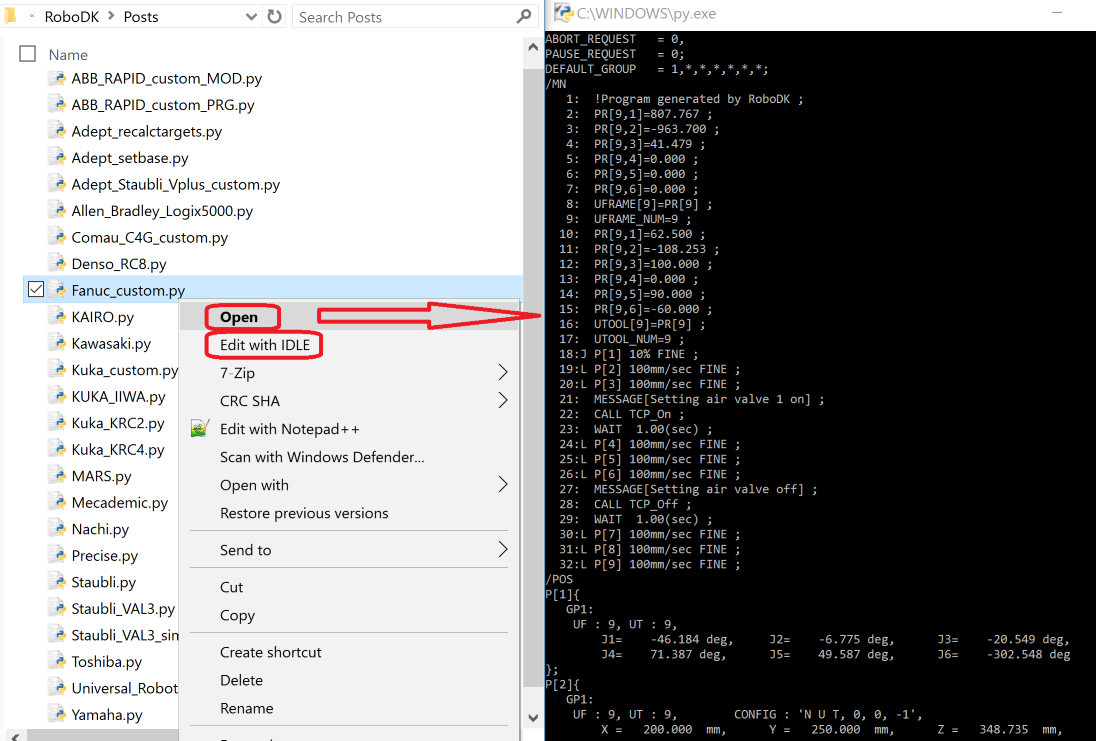
1.Go to the post processors folder: C:/RoboDK/Posts/
2.Open a PY file with Python IDLE (right click ➔ Edit with IDLE) or other text editor.
3.Make the desired changes.
4.Run the file to test the result: Select Run➔Run module (F5 by default) from Python IDLE.
Alternatively, it is possible to edit this file using a text editor and run it with Python by double clicking it.
Modification Examples
This section will show you how you can make small changes to an existing post processor. Most post processors have some variables that can be easily modified to change or activate vendor-specific robot programming features.
As an example, the following changes will be made to existing KUKA and ABB post processors:
●Generate a program with its subprograms as one file and force programs to have 3000 lines of code per program at most. Large programs will be divided into smaller programs and called sequentially.
●Set a joint movement to generate the motion command using joint angles information.
●Override the maximum speed to 500 mm/s. Even if the robot is programmed to move faster, the speed will be limited to 500 mm/s in the post processor.
The following sections show how to make the suggested changes on a text editor.
Generate all programs in one file
This example will show you how you can change the default behavior of the KUKA KRC4 post processor to generate a main program with its subprograms in the same file.
Make sure the post processor editor plug-in is enabled and follow these steps to make the post processor modifications:
1.Select Program➔Post Processor Editor.
2.Select the post processor you want to customize (KUKA KRC4).
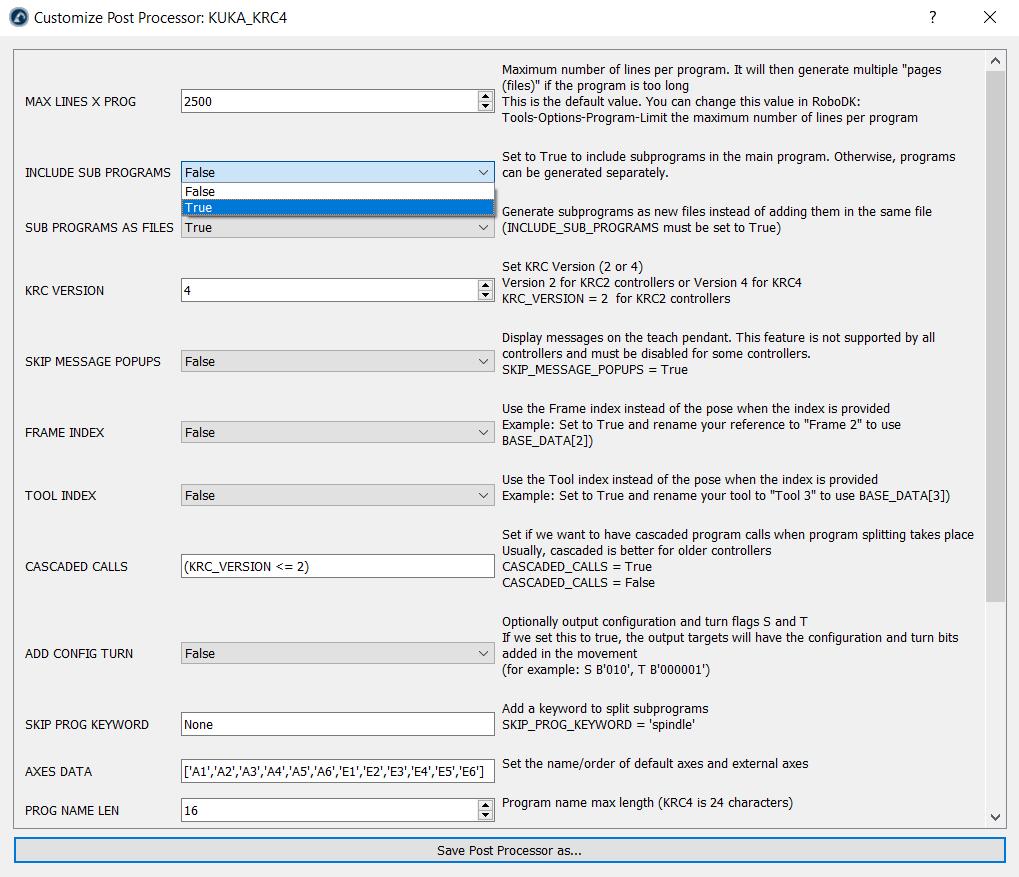
3.Select OK. A new window will open, and you’ll see the variables you can modify as shown in the following image.
4.Set the Include Sub Programs variable to True instead of False.
5.Select Save Post Processor as…
6.Enter a new name to save it (the default name uses the modification date).
You should now have a new post processor in the Posts folder of RoboDK. You can now update your project to use this new post processor by following these steps:
1.Right click your robot.
2.Select Select Post Processor.
3.Select the new post processor you created.
4.Generate your programs again to see the result.
You could also make these changes using a text editor. Follow these steps to change the default Python code of the post processor:
1.Select Program➔Add/Edit Post Processor
2.Select your post processor. For example, for KUKA KRC4 select KUKA_KRC4.
3.Select OK. The post processor will be shown in a text editor.
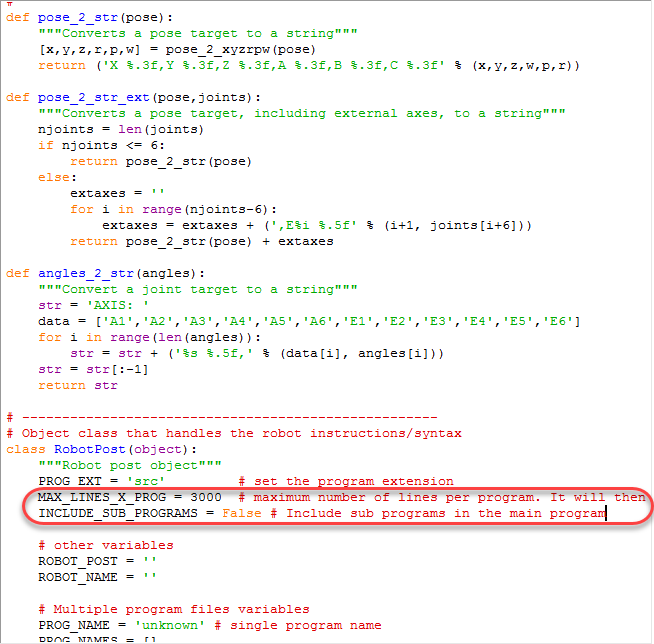
4.Set the variable MAX_LINES_X_PROG to 3000.
5.Set the variable INCLUDE_SUB_PROGRAMS to True.
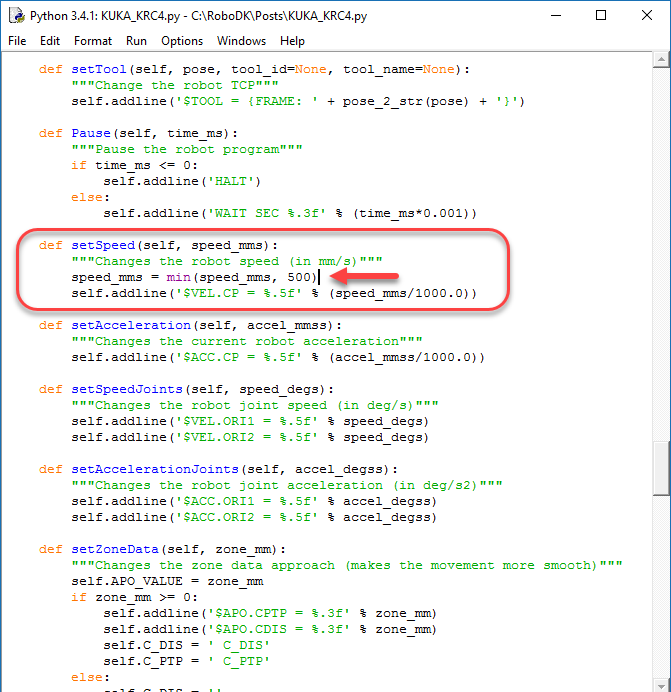
Force a speed limit
This example will show you how you can impose a speed limit of 500 mm/s and avoid using higher speeds when generating a program with RoboDK.
In this example we assume we are using a KUKA KRC2 or KRC4 controller:
1.Select Program➔Add/Edit Post Processor
2.Select your post processor. For example, for KUKA KRC4 select KUKA_KRC4.
3.Select OK. The post processor will be shown in a text editor.
4.Locate the setSpeed function definition (def setSpeed)
5.Add the following line to make the maximum speed 500 mm/s. The line needs to be added before generating the $VEL.CP output which will change the speed in m/s:
speed_mms = min(speed_mms, 500)
Custom filter for frames
This section shows how you can customize setting the reference frame of an existing post processor. For example, setting a custom reference frame for a KUKA robot.
You can use compiled post processors and easily reimplement only necessary functions (for example, setFrame setTool or setSpeed).
In this example, we assume that we want to customize how the base is defined for a KUKA controller. For example, if you want to output the following line when setting the reference frame:
BASE_DATA[8] = {FRAME: X:2000, Y:0, Z:0, A:0, B:0, C:0}
BAS (#BASE,8)
You simply need to create a new file called KUKA_Custom_Post.py in the C:/RoboDK/Posts/ folder with this the following few lines, which uses the default KUKA_KRC2 post processor and overrides setting the reference frame (setFrame function):
from KUKA_KRC2 import RobotPost as MainPost
class RobotPost(MainPost):
def setFrame(self, pose, frame_id, frame_name):
"""Change the robot reference frame"""
self.addline('; BASE_DATA[8] = {FRAME: %s}' % (self.pose_2_str(pose)))
self.addline('BAS (#BASE,8)')
However, we could add custom filters based on certain criteria to filter between using the default behavior and using a custom implementation. The post processor file could then be modified as follows:
from KUKA_KRC2 import RobotPost as MainPost
class RobotPost(MainPost):
def setFrame(self, pose, frame_id, frame_name):
"""Change the robot reference frame"""
if frame_name == "Frame 4": # Enter any condition here
# Trigger the call to the default method (same as not overriding the function)
super(MainPost, self).setFrame(pose, frame_id, frame_name)
return
# Implement a custom setFrame
self.addline('; ---- Setting reference: %s ----' % frame_name)
self.addline('; BASE_DATA[8] = {FRAME: %s}' % (self.pose_2_str(pose)))
self.addline('BAS (#BASE,8)')
self.addline('; --------------------------')
When you generate programs for KUKA KRC controllers, there are many ways you can set your coordinate system or reference frame. The following definition of setFrame shows an alternative implementation with different options:
def setFrame(self, pose, frame_id, frame_name):
"""Change the robot reference frame"""
self.addline('; ---- Setting reference: %s ----' % frame_name)
# option 1: Build the kinematics based on the MACHINE_DEF array and the provided offset
#self.addline('$BASE = EK (MACHINE_DEF[2].ROOT, MACHINE_DEF[2].MECH_TYPE, { %s })' % self.pose_2_str(pose))
# option 2: Build the kinematics based on the EX_AX_DATA array and the provided offset
#self.addline('$BASE=EK(EX_AX_DATA[1].ROOT,EX_AX_DATA[1].EX_KIN, { %s })' % self.pose_2_str(pose))
# Option 3: Build the kinematics based on the EX_AX_DATA array and the pre-defined offset
#self.addline('; Using external axes')
#self.addline('; $BASE=EK(EX_AX_DATA[1].ROOT,EX_AX_DATA[1].EX_KIN,EX_AX_DATA[1].OFFSET)')
#self.addline('; $ACT_EX_AX= %i' % (self.nAxes - 6))
# Option 4: Use the BAS(#ex_BASE) init function from the BAS.src file
#self.addline('; BASE_DATA[%i] = {FRAME: %s}' % (self.BASE_ID, self.pose_2_str(pose)))
#self.addline('BAS(#ex_BASE,%i)' % self.BASE_ID)
# Option 5: Use the BAS(#BASE) init function from the BAS.src file
self.addline('; BASE_DATA[%i] = {FRAME: %s}' % (self.BASE_ID, self.pose_2_str(pose)))
self.addline('BAS (#BASE,%i)' % self.BASE_ID)
# Option 6: Directly take the base from the BASE_DATA array (usually what the BAS(#BASE) does)
# self.addline('$BASE=BASE_DATA[%i]' % self.BASE_ID)
self.addline('; --------------------------')
Impose a movement using joint angles
This section will show you how you can modify an existing post processor to force an axial movement using joint values instead of Cartesian values.
In this example we’ll apply this change to an ABB IRC5 robot controller.
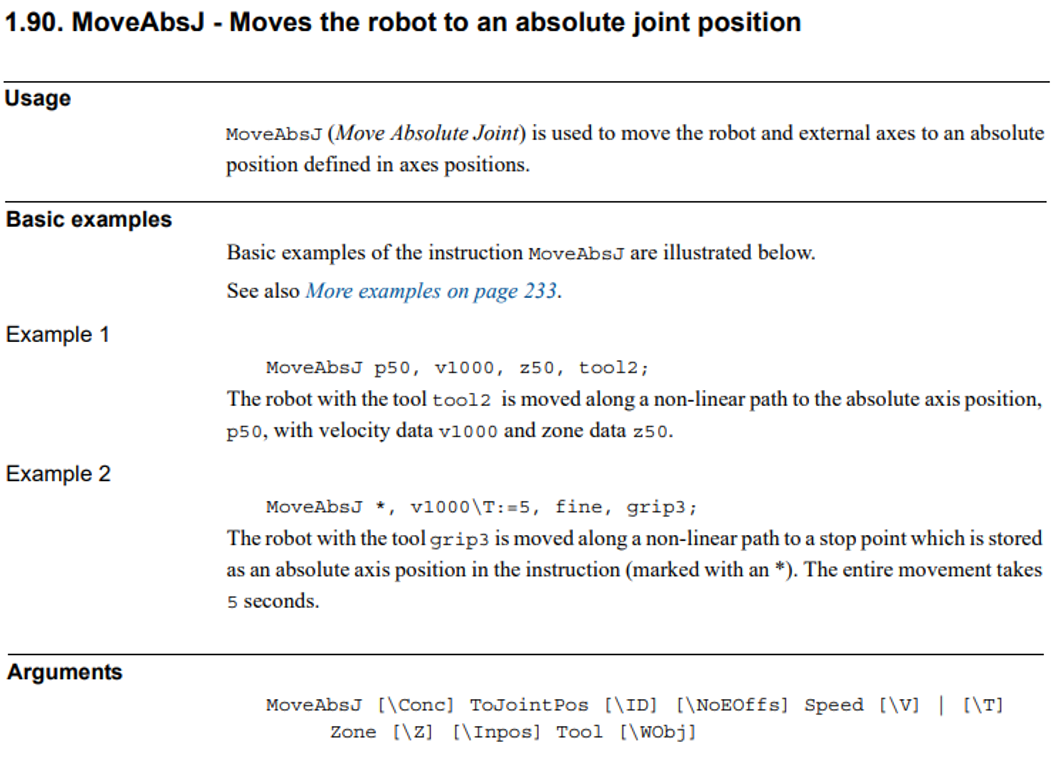
1.Find the programming manual of your robot controller. In this example we use the ABB IRC5 RAPID programming manual.
2.Look for the joint movement instructions. In this case, ABB’s absolute joint movement command is called MoveAbsJ. This command requires a jointtarget variable that defines the joint axes.
3.Select Program➔Add/Edit Post Processor and select the post processor you are currently using to modify it. If you are currently using a customizable post processor it will be selected by default.
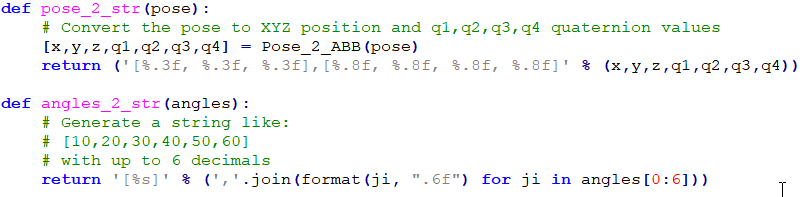
4.You should look for the MoveJ function inside the post processor. This function defines the way post processors generate the joint motion commands. Alternatively, RoboDK uses MoveL for linear movements. Using Python programming language, modify the line that is added to the program file to provide joint angle information, as shown in the following image.

5.Finally, you may need to modify the way the post processor converts the joint angles or the pose to a string. The functions angles_2_str and pose_2_str define how the joint angles and a pose, respectively, is converted to text.
Most RoboDK post processors use joint data for joint movements and Cartesian coordinates for linear movements. It is recommended to always start the first point in a sequence of linear movements as a joint movement, specifying joint coordinates. This avoids starting a program with the wrong robot configuration and reaching a singularity or axis limits.
Available Post Processors
RoboDK provides over 100 post processors by default to support generating robot programs for over 40 robot manufacturers. Some post processors can be further customized to generate programs with a specific format.
You can find the complete list of available post processors in the RoboDK Library by navigating to https://robodk.com/posts. You can also select Tools➔Open Robot Library from the main toolbar in RoboDK to find available robots, post processors, Add-ins and more.
You can find the following post processors available when you install RoboDK:
●ABB RAPID IRC5: for ABB IRC5 robot controllers.
●ABB RAPID IRC5 Robtargets: for ABB IRC5 robot controllers and generates robtarget names.
●ABB RAPID S4C: for ABB S4C robot controllers.
●Adept Vplus: for Adept V+ programming language.
●Allen Bradley Logix5000: for Allen Bradley Logix5000 PLC.
●Annin Robotics: for AR3 and AR4 robots.
●Aubo: for AUBO robot controllers.
●Aubo ARCS: generates code (.lua and .pro) for AUBO ARCS robotic controllers.
●Automata: for Automata EVA robots.
●Borunte: for Borunte robot arms. Generates zip-package with necessary files for BRTIRUS robot controllers.
●Brooks: for PreciseFlex robots.
●CLOOS: for CLOOS robot controllers.
●Comau C5G: for Comau C5G robot controllers (PDL files).
●Comau Nodal: for Comau C5G robot controllers using modern Comau Nodal programs (PDL2 language).
●CPR: produces XML-formatted code suitable for CPR robotic systems.
●CSV: generates simple CSV-formatted files for generic robotic and automation controllers. This post processor is versatile and can be used in applications requiring straightforward data import and export.
●Denso PAC: for Denso RC7 (and older) robot controllers (PAC programming language).
●Denso RC8: for Denso RC8 (and newer) robot controllers (PacScript programming language).
●Dobot Magician: for educational Dobot robots.
●Dobot MG400: for the scara Dobot robot.
●Dobot: for the industrial line of Dobot robots.
●Doosan: for Doosan collaborative robots.
●Elite CS: generates code for Elite CS robot controllers.
●Elite EC: generates code for Elite EC robot controllers.
●Estun RC: for Estun RC robot controllers.
●Epson RC: for Epson robot controllers.
●Fairino: produces .lua files and supports the Fairino FR series of robots.
●Fanuc R30iA: for Fanuc R30iA and R30iB robot controllers.
●Fanuc R30iA Arc: for Fanuc Arc welding.
●Fanuc RJ3: for Fanuc RJ3 robot controllers.
●Flexiv: generates trajectory files (.traj) for Flexiv Hesper controllers.
●Foxbot: generates .pac files for Foxbot controllers.
●GCode A3200: generates .cnc files that are specifically formatted for Aerotech's A3200 controllers.
●GCode BnR: for B&R robot controllers.
●GCode NCP: generates .cnc files compatible with controllers that support the NCP language.
●GSK: for GSK robots.
●Hans: for HAN’S robot controllers.
●HCR: for Hanwha robot controllers.
●HIWIN HRSS: for HIWIN robots.
●Huayan: for Huayan Robotics robots (formerly known as Han's Robot), including a script and a json file.
●Hyundai: for Hyundai robot controllers.
●IGUS: generates XML-formatted code suitable for igus robotic systems.
●IIMT: generates .txt files that you can load in IIMT CR robot controllers easily.
●Inexbot: generates .JBI files specifically designed for Inexbot controllers (Inform III).
●JAKA: for JAKA robot controllers.
●Kassow: generate code for Kassow Robots KR2 controllers.
●Kawasaki: for Kawasaki AS robot controllers.
●KEBA KAIRO: for Keba Kairo robot controllers.
●Kinova: for Kinova robots.
●Kinova Link6: generates JSON (.json) code, compatible with Kinova Link 6 robotic arms.
●KUKA app4PostPro: produces .csv files designed for KUKA KR C4 controllers with app4PostPro.
●KUKA CNC: generates .nc files designed for KUKA.CNC systems.
●KUKA EntertainTech: generates .src and .emily files for KUKA robotic controllers with the Entertain Tech package.
●KUKA IIWA: for KUKA IIWA sunrise programming in Java.
●KUKA KRC1: for KUKA KRC1 robot controllers.
●KUKA KRC2: for KUKA KRC2 robot controllers.
●KUKA KRC2_CamRob: for KUKA CamRob milling option.
●KUKA KRC2_DAT: for KUKA KRC2 robot controllers including DAT data files.
●KUKA KRC4: for KUKA KRC4 robot controllers.
●KUKA KRC4 Config: for KUKA KRC4 robot controllers with configuration data in each line.
●KUKA KRC4 DAT: for KUKA KRC4 robot controllers including DAT data files.
●KUKA KRC5: for KUKA KRC5 robot controllers.
●MARS: generates .gpl files for MARS systems.
●MABI: for MABI robot arms which use Siemens Sinumerik robot controllers (G-code).
●Mecademic: for Mecademic’s script code required by the Meca500 robot.
●Mecademic Python: it generates a Python script that can control the Mecademic Meca500 robot remotely.
●Mitsubishi: for Mitsubishi robot controllers.
●Motoman/Yaskawa: for different Motoman robot controllers using Inform II and Inform III (JBI). It requires knowing the pulses/degree ratio for each axis. You can upload the ALL.PRM file in your project to automatically extract this information.
●Motoman Cartesian: for Yaskawa/Motoman robot controllers using Cartesian values. You may require the Relative Job option on the robot controller if you want to manually modify this program on the robot controller.
●MyCobot: generates Python code compatible with MyCobot robotic arms.
●Nachi AX FD: for Nachi AX and FD robot controllers.
●Neura: generates a NeuraPy Python script compatible with the Neura Robotics Real-Time NR-Motion Master controller.
●NEWKer i6: generates code designed for NEWKer i6 CNC controllers.
●Niryo: generates Python code designed for Niryo educational robots.
●Omron: for Omron-TM robot controllers.
●OTC: for Daihen OTC robot controllers.
●Panasonic: for Panasonic PRG programs (requires Panasonic G2PC tools to compile ASCII files to binary files).
●Precise: for Precise Scara robots.
●QJAR: generates .rbg files for QJAR robot controllers.
●Rainbow Robotics: generates .wsl files for Rainbow Robotics controllers.
●Panasonic: For Panasonic PRG programs (requires Panasonic G2PC tools to compile ASCII files to binary files).
●Robostar: for Robostar robot controllers.
●Rokae: generates .mod files for ROKAE robot controllers.
●Rozum RC API: generates .py files to integrate with Rozum RC Series controllers.
●Rozum RC Pulse: generates .rcp files designed for Rozum RC Series controllers.
●Schneider: for Schneider Electric Lexium controllers.
●Siasun: for Siasun robot controllers.
●Siemens 840D PKM: for PKM robots running the Siemens Sinumerik controller.
●Siemens Sinumerik: for Siemens Sinumerik ROBX robot controller.
●Staubli S6: for Staubli S6 robot controllers.
●Staubli VAL3: to generate Staubli VAL3 robot programs (CS8 controllers and later). It inlines the robot movements.
●Staubli VAL3 Machining: for Staubli VAL3 controllers that have the Machining HSM option.
●Techman: for Techman robot controllers.
●Toshiba: for Toshiba robots.
●Turin: outputs .txt files for Turin robot controllers.
●uArm: outputs .cnc code for uFactory uArm robotic systems.
●Universal Robots: for UR robots, it generates linear movements as pose targets.
●Universal Robots URP: for UR robots, it generates a URP that can be loaded and modified in Polyscope (the UR robot controller).
●Universal Robots_RobotiQ: for UR robots including support for RobotiQ gripper.
●Universal Robots MoveP: for UR robots, it generates linear movements as MoveP commands.
●Wlkata: for WLKATA Mirobot robotic arms.
●xArm: for uFactory xArm robotic systems.
●Yamaha: for Yamaha robots.
Reference
This section includes useful references related to post processors and how to customize them for your needs.
You can find the full list of supported post processors in the library of post processors: https://robodk.com/posts. You can select a post processor to learn more about supported controllers and what parameters you can customize.
You can find the reference documentation for each method in the post processor is available in the RoboDK API section of the documentation: http://robodk.com/doc/en/PythonAPI/postprocessor.html
Most post processors use the robodk.py module. The robodk.py module provides tools for pose operations (multiplications, inverse, …) and conversions between poses to Euler angles in different formats, among other things.
Documentation is available online to learn about Python programming: https://docs.python.org/3/.
When you generate a program in RoboDK, a preprocessed universal Python program is generated and saved in a local temporary folder. The preprocessed program is linked to the right post processor (selected by the user in RoboDK). The post processor has a RobotPost class that defines how the program should be generated for your robot controller.
The precompiled programs are executed using Python.